Apple Tree


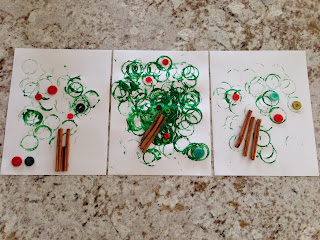
I started doing a Joy School with some ladies in my neighborhood for our three-year-olds. We started with the letter 'A' so we of course had to do some fun apple activities. For their art project, after seeing this post about cinnamon sticks and buttons and this post about circle painting, I combined the two to make this apple tree painting.

Supplies: white cardstock, green washable paint, red and green buttons, cinnamon sticks, hot glue gun, lids/bottles/toilet paper rolls/paper cups (whatever you want to use for the circle painting)

1. Have your child dip the toilet paper roll in the green paint then stamp circles onto the white paper to make a tree.

2. Have your child put the cinnamon sticks and buttons where they want them to be.

3. Since these are harder materials to glue with Elmer's or glue sticks, I opted to hot glue. After the kids placed the objects where they wanted them to be, I glued them on.

The picture above is what I envisioned for the project, the picture below is the actual results!!


*The cinnamon sticks were such a fun object to use on their art project. We were able to smell the sticks and guess what the smell was. You could expand this and do a whole unit on the sense of smell: grab some other fall scents out of your pantry (nutmeg, pumpkin, etc.) and let their little noses get to work!


We of course had to read a book during our project. This is the apple book I picked: 

10 Activities to do with a ROLL OF MASKING TAPE

As cold weather is approaching I am trying to arm myself with some fun indoor activities to keep the kiddos busy. I like cheap and easy activities so I am in LOVE with all the fun ideas of what to do with a roll of masking tape! Here are ten of my faves!


Hopscotch
*On days that I don't want to tape out the entire hopscotch, I've just put lines of tape a foot or two apart and had the kids hop from one line to the next. They love it! 


ABC Floor Circle
Source: Totally Tots
LOVE doing an ABC circle! There are so many things to do with this activity.
Some ideas from 'Totally Tots' post:
-Have your child run around the circle then call out a letter and the child stops on that letter.
-Use ABC bean bags and match letters (could try with upper and lower case matching).
-Have your child sit, stomp on, or point to a particular letter.

Some things we have done with the ABC floor circle:
-I will put out 26 different object that all start with a different letter in the alphabet (ie: banana, comb, dog stuffed animal, Kool-aid packet, zucchini, etc.) and my son will take the object and put it on the letter it starts with.
-My son will run around to different letters then he will say words that begin with each letter. And vice versa- I call out a word and he runs to the letter it starts with. 


Masking Tape and Cars
Source: Welcome Baby


TicTacToe


Giant Shape Sort


Number Squares
Source: Dream Gym
Call out a number and have your child hop to the correct number. 
*For older children, you could call out a math problem and have them jump to the correct answer 
(ie: Call out "2+2" and your child jumps on the 4.)


Tape Shapes
Tape different shapes on the ground then have your child figure out the number of sides the shape has. 


Masking Tape Maze


3D Masking Tape Maze
Have your child crawl through the maze without breaking the tape


Teach Basketball and Math
Source: My Husband
My son is really into numbers and math right now and my husband is into basketball. So my husband mixed the two together, added some masking tape and... Viola!
My husband labeled the tape with the name of the shot and points (dunk 2, free throw 1, top of the arc 3) but you can just do the numbers. If you want to focus more on math than on teaching the basketball scoring system you can put lines all over the floor with different numbers (7, 11, 4, etc.) then have your child keep score by adding as they play basketball. For even older kids you can subtract, multiply, etc!


I hope you have fun trying out some of these masking tape activities!


*FYI: From comments on these activities, some moms were using the colored masking tape and didn't take it off right after the activity then it was ruining their floor. So use regular masking tape or take off the colored tape quickly! 

Melting Hot Chocolate Souffle (Roy's)

ALOHA!
I just went on vacation to Hawaii and it changed my life! 

Not because of this...

Or even this....

But because of this...
I ate at Roy's and finished my meal off with Roy's Classic Melting Hot Chocolate Soufflé right out of the oven served with a heaping scoop of creamy vanilla ice cream. 


Life changing. 


So when I got back to the mainland I immediately searched the internet for the recipe. I was apprehensive about it because I had never made a souffle before but it turned out perfectly and it was just as life changing. 


ROY'S CLASSIC MELTING HOT CHOCOLATE SOUFFLE
(Serves 4)

Ingredients:
1 cup sugar
3 Tbsp cornstarch
4 eggs plus 4 egg yolks
12 Tbsp butter
8 oz semisweet dark chocolate 
(I only had semisweet chocolate chips and they worked great!)

Preparation:
In a mixing bowl, combine sugar and cornstarch. In a separate bowl, mix eggs and yolks together. In a saucepan, bring butter to a simmer, then add the chocolate. Mix until the chocolate is smooth and begins to simmer along the edges. (The chocolate will melt quickly but it takes a few minutes to get it to simmer around the edges). Combine this chocolate mixture with the sugar and cornstarch and mix thoroughly. Add eggs and mix at low speed until sugar is dissolved and mixture is smooth. Refrigerate overnight in a bowl. (The first time I made this I was too impatient to refrigerate and cooked it right after preparation. It still tasted amazing but didn't have the melting chocolate inside. After refrigerating it overnight the batter is cold enough that the soufflé won't cook all the way through and you'll end up with amazing melted chocolate gooey goodness!)

Preheat oven to 375 degrees. 

If you are using soufflé rings- find preparation instructions here.

I used 4" diameter ramekins and was able to make 4 soufflés. 
Spray ramekins with non-stick cooking spray. Or you can butter and sugar the ramekins. (I tried it both ways and they both worked great). Fill each ramekin 2/3 full with the batter. Bake for 28-30 minutes. 

Serve with ice cream. 


I hope this changes your life like it has mine! 

Top of the muffin to you!


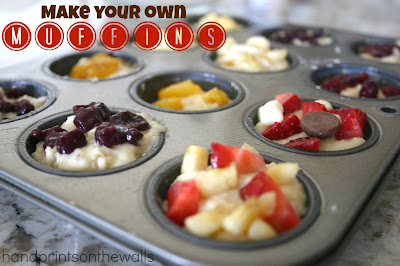
This recipe is for even the pickiest of eaters! Instead of making a snack that no one eats or making different snacks for each of your kids, how about you let them make their own! You provide the basic muffin and they create a masterpiece with all the toppings they want!

1. Make a basic plain muffin batter. You can find a good basic muffin recipe here, here, and here.


2. Pour muffin batter into greased muffin tin.


3. Supply the toppings (blueberries, strawberries, bananas, peaches, cinnamon, nuts, chocolate chips, brown sugar, raisins, etc.)


4. Let your children make their own muffin creations by topping their muffin with items of their choice.

*Some of the toppings can get a little hard if baked on top of the muffin so you can take a utensil and stir the toppings into the base of the muffin.


5. Bake according to muffin recipe directions. (Usually at 375 degrees for 20 minutes)


6. Enjoy!


And your muffin creations would not be complete without reading a muffin book:


*And I couldn't help but post this Link to Seinfield's "Top of the Muffin" episode. Classic!!


Pinterest PASS or FAIL: Kid Activities

With SO MUCH on Pinterest, it's hard to know what works and what doesn't. This summer we tried out some kid activities we found through Pinterest with a 4, 5, and 6-year old boy and they let us know what activities PASSED and which ones FAILED!


Bike Wash
Source: Instructables
Connect PVC, drill holes, insert water misters and hook up to hose. Worked like a champ until the little ones turned the water up and the pressure blew out the misting posts. D'oh! Pass anyway. The boys LOVED it!


 Permanent Marker Dishes
FAIL.
Color dish with permanent marker. Bake at 350 degrees for 30 minutes. Wash by hand.
I skipped the last step and went straight to the dishwasher and all their art washed away. Oops. Should have seen their sad faces when I opened the dishwasher.
*Make sure to WASH BY HAND
* Use a porcelain 150 pen instead of permanent marker


 Snack names
Write your name on a paper. Trace name with glue. Glue snacks on to your name.
PASS!


 Symmetry experiment with faces
Source: Dee Construction
The 5 and 6 year old passed but the 4 year old needs intervention!


Painter tape web game
Fail. 
Except the boys loved tearing it down.


 Marshmallow Launcher
Source: The Giggling Green Bean
PASS.
This was a cinch to make and the little people loved it. Instructions suggested that we launch mini marshmallows, but we found smarties left a nice welt on our moving targets!


 Tornado in a Jar
FAIL. Fill jar with water, add a drop of soap and swirl. 
Luckily the ice cream truck drove by just then and the kids could stop shaking the jars of disappointment.


 Jello Worms
Source: all over Pinterest!
Pass!
If you haven't tried these Jello worms, your boys are missing out on part of their childhood. 


Watermelon on a stick
PASS for kids
FAIL for mom (trying to stab a dull stick into an inch of rind is not the easiest thing!)


Outside water bed
Duck tape tarps together. Fill with water. Add kids. Enjoy!
It was incredible to watch the boys find countless ways to enjoy this waterbed. Hours of fun!! 


Lemon Strawberry Yogurt Bundt Cake

While we're on the subject of fruity desserts, here's another that will knock your socks off!

This recipe is originally from A Spicy Perspective. It's lemony, strawberry-ey, tangy, sweet, and oh so delicious! We vamped up the presentation a little by adding strawberries into the 'hole' of the bundt cake and thickening the glaze for a drizzle look. Without further ado, here's the recipe:

Ingredients:
1 cup (2 sticks) butter, softened
2 cups sugar
3 eggs
3 TB lemon juice, divided
Zest of 1 lemon
2 1/2 cups all-purpose flour, divided
1/2 tsp baking soda
1/2 tsp salt
8 oz plain (or vanilla) Greek yogurt
12 oz fresh strawberries diced (plus 1 cup diced strawberries for center-optional)
1 cup powdered sugar (might need a little more to thicken the glaze)

Directions:
1. Preheat oven to 375 degrees. Grease and flour a 10 inch Bundt pan.

2. Sift together the 2 1/4 cups of flour, baking soda, and salt. Mix in the lemon zest and set aside.

3. With an electric mixer, cream together the butter and sugar until light and fluffy. Beat in the eggs one at a time, then stir in 1 TB lemon juice. Alternate beating in the flour mixture and  the yogurt, mixing just until incorporated.

4. Toss the strawberries with the remaining 1/4 cup of flour. Gently mix them into the batter.

5. Pour the batter into the Bundt pan. Place in the oven and reduce the temperature to 325 degrees. Bake for 60 minutes, or until a toothpick inserted into the center of the cake comes out clean.

6. Allow to cool 20 minutes in the pan, then turn out onto a wire rack and cool completely.

7. Once cooled, whisk together the remaining 2 TB of lemon juice and the powdered sugar. If you want the look in the picture above, add a little more powdered sugar until you have a thick (but not too thick) glaze. Pour the glaze into a ziploc bag, cut a small hole in the corner of the ziplock back and drizzle from the center to the outside of the cake back and forth.
*Make sure the cake and the glaze are cool.

8. Before serving, cut about a cup of strawberries and place in the center of the bundt cake (optional).


*And what better time to read your child a good strawberry book than while you are eating a slice of this yummy strawberry cake. Here are a couple of my faves!


Mini Peach Dream Desserts


Peaches... I love peaches! I wait all year for peach season...and my family waits all year for peach dream dessert!

This recipe can be made in a cake pan but today I made it in individual mini cups. The individual desserts are great for parties, get-togethers, and are a little more kid friendly. 


Ingredients: 10 large peaches, one box of vanilla wafers, 1/2 cube butter (softened), 3/4 cup sugar, whipping cream (whipped and sweetened), one egg (I usually don't use the egg and just throw in a little more butter. I know the egg is okay in there with the sugar and I have no problem eating raw cookie dough but I usually don't use it in this recipe. Make sure to add more butter if you don't use the egg cause the crust will need a little more liquid), clear plastic cups (or little mason jars).


1. Crush the vanilla wafers in blender or food processor. (It's easiest to do just a couple cups of wafers at a time)


2. Mix together softened butter, sugar, vanilla wafers, (and egg if using)


3. Cut up your peaches into bite size pieces.

4. Put a layer of vanilla wafer crust on the bottom of your cup. Then put a good layer of cut peaches, add a layer of whipped cream, then sprinkle a little of the vanilla wafer crust on top.


5. Enjoy your peach dream dessert and the last rays of summer!


*You can make the crust ahead of time and store in the fridge until you are ready to assemble. Also, if you have extra crust you can store that in the fridge for a few days until you are ready for more of this dessert!


*And you can top your peach season off with a peachy classic